We use cookies to make your experience better. To comply with the new e-Privacy directive, we need to ask for your consent to set the cookies. Learn more.

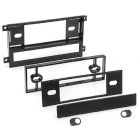
Metra Dash Kit 99-1003 Radio Installation Kit Kia Rio, Sephia, Spectra and Sportage 1995-2003 Multi-Kit Vehicles
$16.99
In stock
SKU
99-1003

Expert Knowledge
Talk to a specialist
Metra Dash Kit 99-1003 Radio Installation Kit Kia Rio, Sephia, Spectra and Sportage 1995-2003 Multi-Kit Vehicles
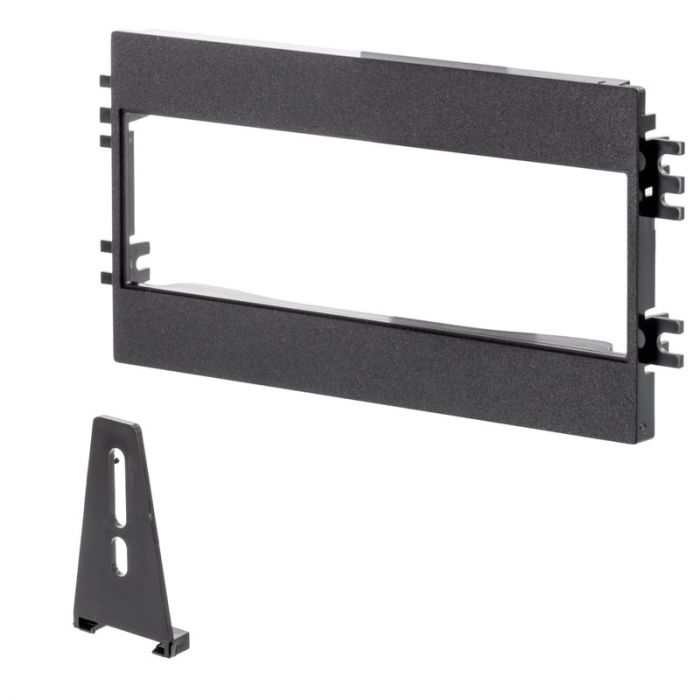
Unit Includes: Radio Housing 1, Radio Housing 2, Mounting Brackets, (4) Captive Studs and (4) Pal Nuts
Metra Dash Kit 99-1003 Radio Installation Kit Kia 1995-2003 Multi-Kit Vehicles features:
Metra Dash Kit 99-1003 Radio Installation Kit Kia 1995-2003 Multi-Kit Vehicles features:
- Bolts directly onto factory radio mount locations
- DIN Radio Provision
- Kit Components - Radio Housing 1, Radio Housing 2, Mounting Brackets, (4) Captive Studs and (4) Pal Nuts
- Tools Required - Phillips screwdriver, Panel Removal Tool and Cutting Tool
- Metra's Install kits are manufactured from OEM quality ABS plastic designed to leave no gaps between the dash and the kit.
- WIRING AND ANTENNA CONNECTIONS (Sold Separately)
- Harness 70-1003 (KIA Harness 1995-2002)
- Antenna Adapter Not Required
- Kia Rio 2001
- Kia Sephia 1995-2001
- Kia Spectra 2000-2001
- Kia Sportage 1995-2003
- 99-1003 Instruction Manual
| Manufacturer | Metra |
|---|---|
| Part Number | 99-1003 |
| Chassis Size | Single DIN |
| Color | Black |
| Warranty | 1 Year |
| Vehicle Year | 1995, 1996, 1997, 1998, 1999, 2000, 2001, 2002, 2003 |
| Vehicle Brand | Kia |
| UPC Code | 086429078431 |
| Return period | 30 days |
| Exchange period | 30 days |
Write Your Own Review
Customer Questions
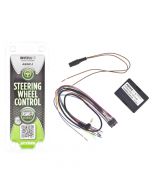
Car stereo installation
We show you the complete process of installing a Pioneer Double DIN car stereo in a Chevy truck. The in-depth video shows the installation of the interface, and steering wheel control.
Stereo Installation Basics
Let's start with the basics of replacing your car stereo receiver. In out first video we demonstrate how to crimp or solder your wiring, mount your new receiver to your dash kit and prepare everything for an installation in your vehicle.
Wiring Harnesses Explained
What do all of the wire colors mean? Aftermarket manufacturers have made car stereo receiver installation an easier process by using a standardized wire color scheme. We walk you through what each individual wire does, this way if you have an installation that doesn't perform properly you will have the resources to begin troubleshooting your installation.
Related Products
Check items to add to the cart or

More from Metra