We use cookies to make your experience better. To comply with the new e-Privacy directive, we need to ask for your consent to set the cookies. Learn more.

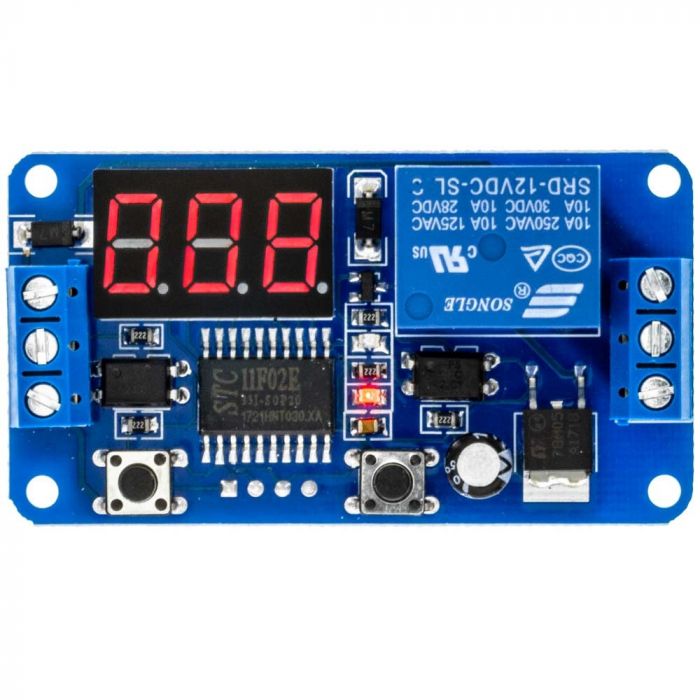
QMV TDR12V4 6-30 VDC SPDT 0.1 seconds to 999 Minutes Adjustable Time Delay On or Off Relay with looping
$13.99
In stock
Only 10 left
SKU
TDR12V4

Expert Knowledge
Talk to a specialist
- 0.13 seconds to 60 Minutes delay turn on or off mini relay
- Requires a minimum of 9 volts to function
- 10 amp / 15 amp rated contacts
- SDST - Single pole Dual throw
Unit includes: 12 volt time delay relay
QMV TDR12V4 6-30 VDC SPDT 0.1 seconds to 999 Minutes Adjustable Time Delay On or Off Relay with looping
QMV TDR12V4 6-30 VDC SPDT 0.1 seconds to 999 Minutes Adjustable Time Delay On or Off Relay with looping
Features:
- 0.13 seconds to 60 Minutes delay turn on or off mini relay
- Circuit board design with dual LED's
- Relay will operate on a wide spectrum of voltage from 6 volts to 30 volts DC
- Supports micro USB 5.0V power supply
- Adjustable time delay turn on from 0.13 seconds to 60 Minutes with push buttons and LCD display
- Reverse polarity protection
- Relay resets once power is removed
- 4-button controls for setting on operating time delay with emergency stop function
- 3.0 Volt - 24 Volt triggered inputs have optocoupler isolation to prevent dc ground issues or short circuits
- 10 amp / 15 amp rated contacts
- SPDT - Single pole Dual throw
- Non-volatile memory - After the relay is powered down, all parameter settings are not lost
- Power consumption @ 12Vdc 20 mA idle, 50 mA operating
- Screw terminals for easy connections up to 14 gauge wire
- Dimensions 1-1/2" (W) x 2-1/2" (L) x 3/4" (H) with terminals
Contact configuration:
- GND - Ground all-time, as this is what grounds the circuit on the relay
- VCC - 12 volt positive connection to trigger the relay
- COM - Common latching relay connection (Can be positive or negative depending on your need)
- NO - Normally open contact (Connects to common when relay latches)
- NC - Normally closed contact (Connects to common when relay is un-energized or at rest)
Uses:
- Low voltage trigger: input will trigger with as little as 3 volts
- Delayed turn onPrevent high current components from switching on during vehicle start (up to 999 minute delay)
- Delayed Voltage inverter:
- Looping timer: Trigger a pump to run for 5 minutes every 2 minutes for a certain amount of cycles or infinite while relay is powered
- Delayed turn off: Trigger a a device to turn off 5 minutes after a trigger is sent
Operating Modes:
- P1.1 - Requires trigger to initiate timer for OP time setting, then shuts down. Re-triggering will not trigger again until power it removed (Time delay off with NO and NC contacts)
- P1.2 - Requires trigger to initiate timer for OP time setting, then shuts down. Re-triggering will trigger again for OP time setting (Time delay off with NO and NC contacts)
- P1.3 - Requires trigger to initiate timer for OP time setting, then shuts down. Re-triggering will cause relay to stop timer and reset (Time delay off with NO and NC contacts)
- P1.4 -
- P2.1 -
- P2.2 -
- P3.1 - Requires trigger to initiate timer for time delay on, OP time setting is the delay, relay turns off after CL time. Re-triggering will cause relay to stop timer and reset. LOP cycles can be set for this mode (Time delay on with NO and NC contacts)
- P3.2 - No trigger required to initiate timer for time delay on, OP time setting is the delay, relay turns off after CL time. LOP cycles can be set for this mode (Time delay on with NO and NC contacts)
- P-4 - Signal hold function. If trigger is present the relay remains on, when trigger is removed the relay stays latched for OP time. Re-triggering will cause relay to stop timer and reset. (Signal hold on with delayed off - NO and NC contacts)
Legend:
- OP - On time
- CL - Off time
- LP - Loop (Total number of cycles)
Timing range:
- XXX. Decimal point is in one place, timing range: 1 second to 999 seconds
- XX.X decimal point in ten, timing range: 0.1 seconds to 99.9 seconds
- X.X.X. The decimal point is fully illuminated, the timing range is from 1 minute to 999 minutes
Instructions:
- Determine what mode is required for your application
- According to the working mode of the relay, in the main interface (when the module is powered on, it will flash the current working mode (default P1.1 mode), then enter the main interface "press and hold the SET button for 2 seconds and then release" to enter the mode selection.
- You can select the appropriate mode by selecting the mode to be set P1.1 - P-4 by short pressing the UP and DOWN buttons.
- Press the SET button to set the mode.
- Display will flash OP ON time, CL OFF time, LOP cycle number “---” means unlimited.
- To adjust OP/CL/LOP time use the UP, DOWN to adjust the time value.Buttons support long press (rapid increase or decrease) and short press (increase or decrease 1 unit)
- Select the decimal point position by short pressing the STOP button, select Timing range (corresponding time 0.1 seconds to 999 minutes); short press the SET button to set the next parameter of the current mode, the process is the same as above.
- After setting the parameters of the selected mode, press and hold the SET button for 2 seconds to release, the currently set mode will flash, then return to the main interface and set the parameters successfully.
- Main interface: “000” (no decimal point) is displayed when the relay is not working, and the decimal point is clear when the relay is working.
- Mode selection interface: long press SET button to enter, after setting is completed, long press SET button to exit, return to the main interface
| Manufacturer | Quality Mobile Video |
|---|---|
| Part Number | TDR12V4 |
| Relay type | PCB relay |
| California Proposition 65 | |
| Return period | 30 days |
| Exchange period | 30 days |
Write Your Own Review
Relay Pinout Diagrams Explained
A relay pinout diagram shows the function of each terminal (pin) on a relay and how the internal connections work. It helps you wire the relay correctly for your project.
1. Basic Relay Anatomy
Most automotive relays have two main parts:
- Coil – An electromagnet that switches the relay on/off (low current side)
- Switch Contacts – The high-current switch that turns your accessory on/off
2. Most Common Automotive Relay: 5-Pin SPDT
This is the standard relay type used with sockets like BRSCN, BRSPC, BRSS, etc.
| Pin | Name | Function |
|---|---|---|
| 30 | Common | Power input (goes to the load) |
| 87 | Normally Open (NO) | Closed when relay is energized (ON) |
| 87a | Normally Closed (NC) | Closed when relay is de-energized (OFF) |
| 85 | Coil Ground | Negative side of coil |
| 86 | Coil Positive | Positive side of coil (+12V trigger) |
Visual Pinout Diagram
          87
          │
   87a ───┼─── 30
          │
         [Relay]

   85 ───────── 86
How It Works:
- No power to 85/86 → Current flows between 30 and 87a
- +12V applied to 85/86 → Coil energizes → Current flows between 30 and 87
4. How to Read a Relay Pinout Diagram
Most relay pinout diagrams include the following elements:
- A box or outline representing the relay body
- Pin numbers clearly labeled next to each terminal
- Internal connections shown with lines or dotted lines
- Coil symbol (usually a rectangle or spring-like coil)
- Switch contacts shown with an arrow indicating movement when the relay is energized
Example Relay Pinout Diagram:
       87          30
        │           │
        └──────┬────┘
               │
             ┌──┐     ← Moving Contact
             └──┘
            /     \
          87a      (Switches when coil is energized)

    85 ───────────── 86
          Coil
Understanding the Symbols:
- 30 — Common terminal (input power)
- 87 — Normally Open (NO) contact
- 87a — Normally Closed (NC) contact
- 85 & 86 — Coil terminals (control side)
When the relay coil is energized (pins 85/86 powered), the internal switch moves from 87a to 87.
Quick Wiring Examples (5-Pin Relay)
1. Basic On/Off Circuit (Most Common)
Used for lights, fans, fuel pumps, horns, etc.
- 86 → Switched +12V (from switch, toggle, or ECU output)
- 85 → Ground (or switched ground)
- 30 → Constant +12V Power (from battery or fuse box)
- 87 → Output to Accessory (lights, fan, etc.)
- 87a → Not used (leave disconnected)
2. Changeover / Dual Circuit Setup
Use both 87 and 87a when you need to switch between two different circuits.
- 30 → Input Power
- 87 → Circuit A (ON when relay is energized)
- 87a → Circuit B (ON when relay is OFF)
- 85 & 86 → Coil control
3. Typical Pin Connections Summary
| Pin | Connection | Typical Wire Color | Purpose |
|---|---|---|---|
| 30 | Constant +12V | Black (BRS14E & BRS12E) | Power Input |
| 87 | To Accessory | Green (BRS14E & BRS12E) | Power Output (ON) |
| 87a | Optional 2nd Circuit | Blue (BRS14E & BRS12E) | Power Output (OFF) |
| 85 | Ground | White (BRS14E & BRS12E) | Coil Negative |
| 86 | Switched +12V | Red (BRS14E & BRS12E) | Coil Positive |
Tip: Always use a fused power source on pin 30 for safety.
Basic 5-Pin Relay Wiring Harness
Battery +12V ──► [Fuse] ──► Pin 30 (Common)

Pin 87 ──► Accessory (Lights / Fan / Pump / Amp etc.)

Pin 86 ──► Switched +12V Trigger
               (from switch, headlight wire, remote turn-on, etc.)

Pin 85 ──► Ground

Pin 87a ──► (Optional - Not used in basic setup)
Recommended Wiring (Empty relay socket or spade connectors (Not BRS14E & BRS12E):
- Pin 30 — Red wire with inline fuse (closest to battery)
- Pin 87 — Red or Blue wire to device
- Pin 86 — White or Pink trigger wire
- Pin 85 — Black ground wire
Dual Output (Changeover) Relay Harness
Pin 30   → Constant +12V (Fused)

Pin 87   → Circuit A (ON when relay activated)
Pin 87a  → Circuit B (ON when relay is off)

Pin 86   → Trigger +12V
Pin 85   → Ground
Customer Questions
Related Products
Check items to add to the cart or

More from Quality Mobile Video